Let's Workshop: Keyes 9G Micro Servo
Posted by Sebastian Karam on
Here is a quick introduction to using the Keyes 9G Micro Servo motors. Hopefully it will provide you with the confidence to controlled movement to your Arduino projects.
This example will demonstrate the use of an Arduino UNO in the control of a micro servo with the use of the Arduino servo library. Once connected and the program loaded, the UNO rotates the motor 180 degrees clockwise then 180 degrees anti-clockwise.
Components
- 1pcs Arduino UNO or Compatible - LCAA100005
- 1pcs Keyestudio 180 Rotation Servo Motor - AFBA100092
- 12pcs Male to Male Jumper Cables - GBAA100001
Wiring
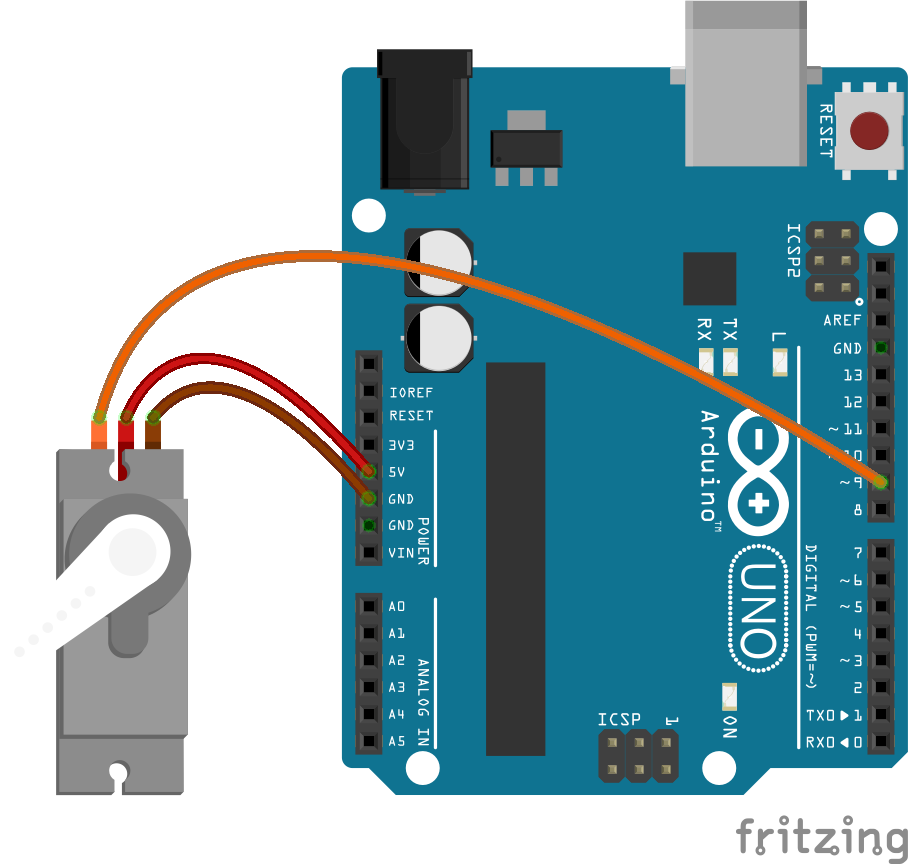
Wire the two boards together as can be seen in the image below, taking care to match the pin numbers.

Coding
The code consists of the a setup and loop. The setup defines the pin to be used in the control of the servo. The loop contains the control program that will run continuously after the setup. It is made up of two loops, one after the other. The first sends a position to the motor then increments the value. This repeats until the value reaches 180. The second sends a position to the motor then de-increments the value. This repeats until the value reaches 0.
15ms delays are placed within both loops to allow the motor time to move into position.
Load the code below into the Arduino IDE and upload it to your board.
/* A simple program designed to setup and demonstrate 180 Rotation Servo Motor - AFBA100092 The program uses a uses a single counter to position servo. A counter will count to 180, pause then return to 0. On each increment the servo motor will be moved to that angle. modified 18 January 2019 by Sebastian Karam - Flux Workshop */ #include// include the servo library Servo microservo; // create servo object to control a servo int counter = 0; // variable to store the servo position void setup() { microservo.attach(9); // sets the servo control pin } void loop() { while (counter <= 180){ // loop that increments the counter up to 180 degrees microservo.write(counter); // send the counter value to the servo library delay(15); // wait while the motor moves into position counter++; // increment the counter } delay(1000); // pause for a second before returning while (counter >= 0){ // loop that decrements the counter up to 0 degrees microservo.write(counter); // send the counter value to the servo library delay(15); // wait while the motor moves into position counter--; // deincrement the counter } delay(1000); // pause for a second before looping the program }
Running
With the board loaded with the program and all the connections made, the motor will begin to turn. It will move accross the full 180 degree range before pausing for a second and making the return rotation.

Points of note
Servos can demand a significant current to operate correctly. This normally manifests itself in the rotation not being smooth. To solve this you may wish to look into a PWM controller.
What to try next?
- Use a rotary encoder to set the counter and control the servo arm position.
Share this post
- 4 comments
- Tags: AFBA100092, Jan 2019, Keyestudio, Micro, Motor, Servo

] Qyeayuluk nns.zkio.fluxworkshop.com.nnj.wf http://slkjfdf.net/
] Eulerat oax.ckfy.fluxworkshop.com.vyl.bg http://slkjfdf.net/
] Oujuhah dzu.yyot.fluxworkshop.com.sga.gd http://slkjfdf.net/
] Arosivuje ayg.beuc.fluxworkshop.com.kwc.jt http://slkjfdf.net/