Let's Workshop: DS1302 Real Time Clock Module
Posted by Sebastian Karam on
Here is a quick introduction to using DS1302 based clock module. This will provide you with an entry point to using timing that is maintained externally when power is not as accessible.
This example will demonstrate the use of an Arduino UNO in setting the time and then reading the time from the module. Once connected and the program loaded, it will load a time and begin to read the chipset's time every second. This will use the DS1302 RTC library created by Matt Sparks to interface with the chipset.
Components
- 1pcs Arduino UNO or Compatible - LCAA100005
- 1pcs DS1302 Real Time Clock Module - BKAA100056
- 5pcs Male to Female Jumper Cables - GBAA100002
Wiring
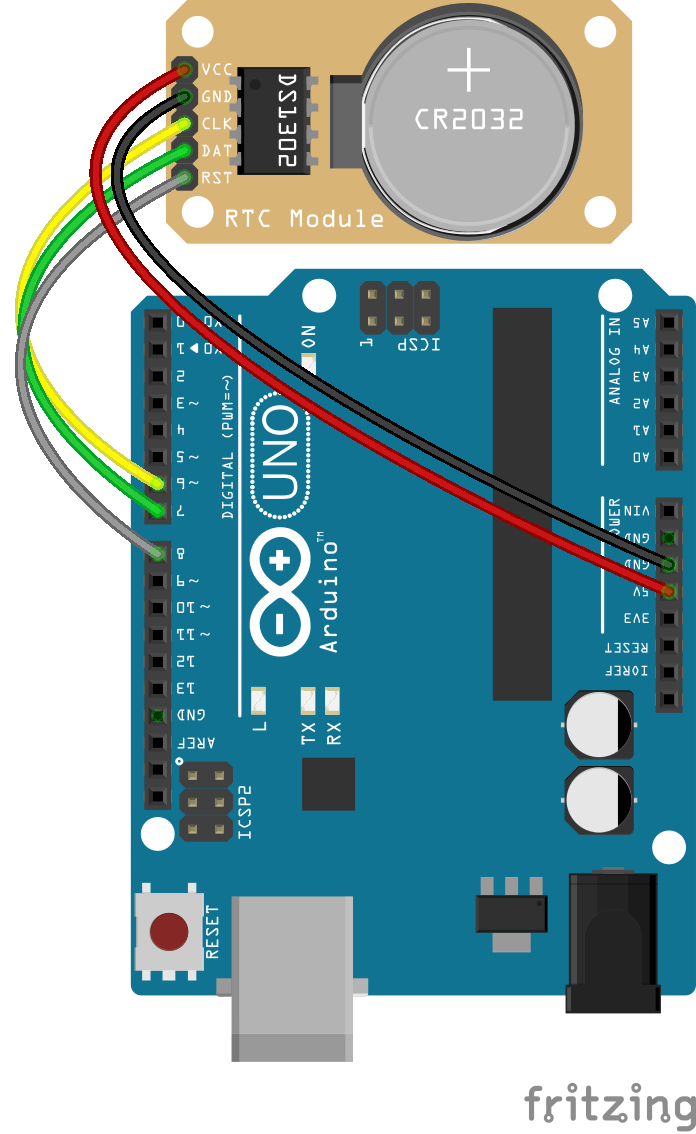
Wire the two boards together as can be seen in the image below, taking care to match the pin numbers.

Coding
The code consists of an include, definitions, 2 functions, setup and loop. First the DS1302 RTC library is linked to the code. This is followed by the pin definitions and initilisation of the clock object used by the library. Next a function that converts the day output by the chipset into a string format. The second function interfaces with the chipset to obtain a time, then join the various elements to for a character array that will be handed back to the calling function. The setup initilises the serial connection. It then sets a date and sends it to the chipset to hold. These 4 lines are not required every time. The loop calls the time from the readTime() function and ouputs it to the serial connection, pausing for a second and repeating.
Load the code below into the Arduino IDE and upload it to your board.
/*
  A simple program designed to setup and demonstrate the DS1302 RTC library and
  DS1302 Real Time Clock Module - BKAA100056

  The program uses the DS1302 RTC library to initialise the DS1302 chipset
  and then read the time from it every second.

  modified 03 March 2019
  by Sebastian Karam - Flux Workshop

  The DS1302 RTC library created by Matt Sparks
  https://github.com/msparks/arduino-ds1302
*/
#include "DS1302.h" // include the DS1302 RTC library

const int ResetPin = 8;  // reset Pin
const int DataPin = 7;  // data Pin
const int ClockPin = 6;  // clock Pin

DS1302 rtc(ResetPin, DataPin, ClockPin); // create a DS1302 object

String dayAsString(const Time::Day day) { // function that converts the day ouptput into a string
  switch (day) {
    case Time::kSunday: return "Sunday";
    case Time::kMonday: return "Monday";
    case Time::kTuesday: return "Tuesday";
    case Time::kWednesday: return "Wednesday";
    case Time::kThursday: return "Thursday";
    case Time::kFriday: return "Friday";
    case Time::kSaturday: return "Saturday";
  }
  return "(unknown day)";
}

char * readTime() { // function that reads the time from the chip and returns it in a character array
  Time t = rtc.time(); // get the time and date from the chip.
  const String day = dayAsString(t.day); // obtain text for the day of the week
  static char CurrentTime[50]; // initialise a character array to hold the date text
  snprintf(CurrentTime, sizeof(CurrentTime), "%s %04d-%02d-%02d %02d:%02d:%02d", day.c_str(), t.yr, t.mon, t.date, t.hr, t.min, t.sec); // format the time into the character array
  return CurrentTime; // return the current time
}


void setup() {
  Serial.begin(9600); // initialise the serial connection
  rtc.writeProtect(false); // turn off write protection
  rtc.halt(false); // clear the clock halt flag
  Time t(2019, 3, 03, 1, 23, 45, Time::kFriday); // create a new time object with set date
  rtc.time(t); // send the time to the chipset
}

// Loop and print the time every second.
void loop() {
  char * timearray = readTime(); // obtain the time from readtime()
  Serial.println(timearray); // print the time to the serial monitor
  delay(1000); // pause before looping
}
Running
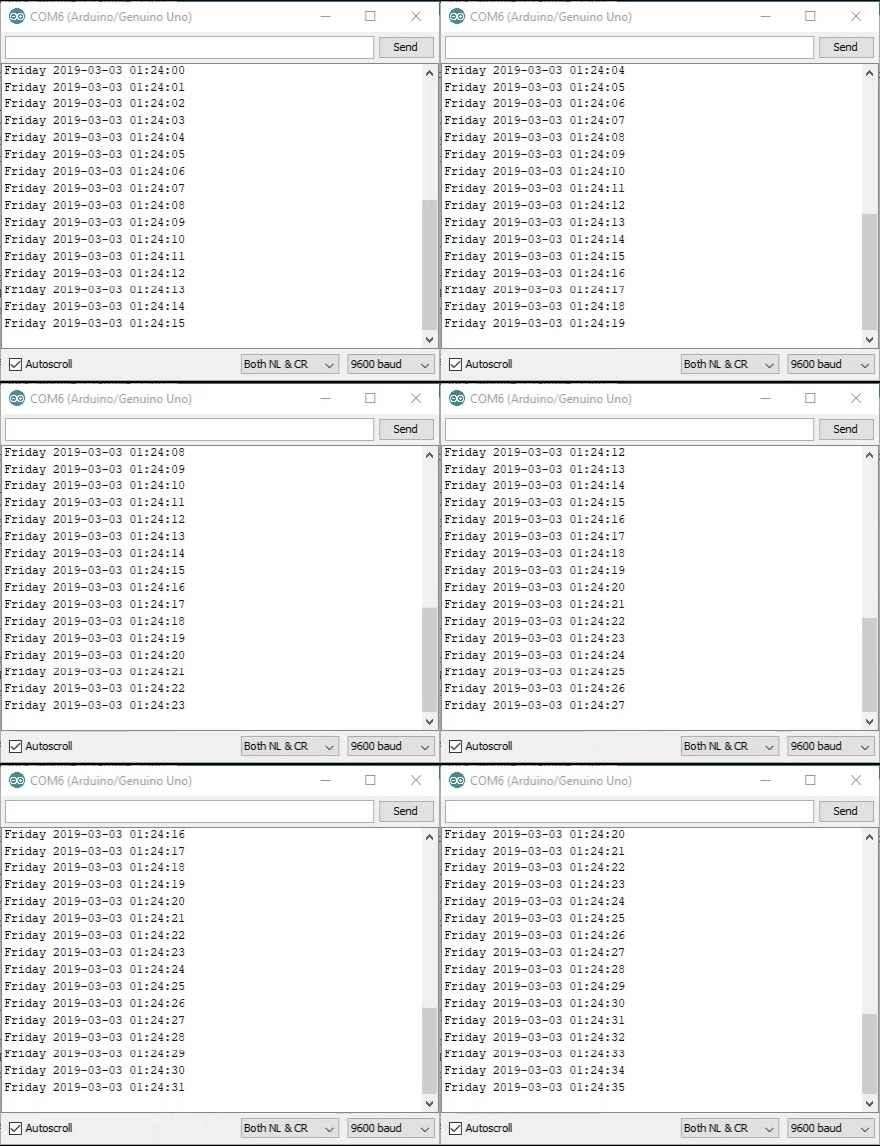
With the board loaded with the program and all the connections made the serial monitor should display a running time counting from the set time. The output should be as seen below.

What to try next?
- Use the timer to log readings from other sensors at particular times
- Write a function to allow the time to be set using a typed entry from the serial monitor
