Let's Workshop: Keyes ADXL345 3 Axis Accelerometer Module
Posted by Sebastian Karam on
Here is a quick introduction to using the Keyes ADXL345 3 axis acceleromter module. This will provide you with an entry point to using the module to track movement.
This example will demonstrate the use of an Arduino UNO in selecting the module from the i2c bus and reading the sensors outputs. Once stored, it will check and pass them to the serial monitor. This will use the Adafruit Unified Sensor Driver library created by Adafruit Industries and the Adafruit ADXL345 Accelerometer Driver library created by Kevin Townsend for Adafruit Industries to interface with the chipset.
Components
- 1pcs Arduino UNO or Compatible - LCAA100005
- 1pcs Keyes ADXL345 3 Axis Accelerometer Module - BDAA100046
- 4pcs Male to Female Jumper Cables - GBAA100002
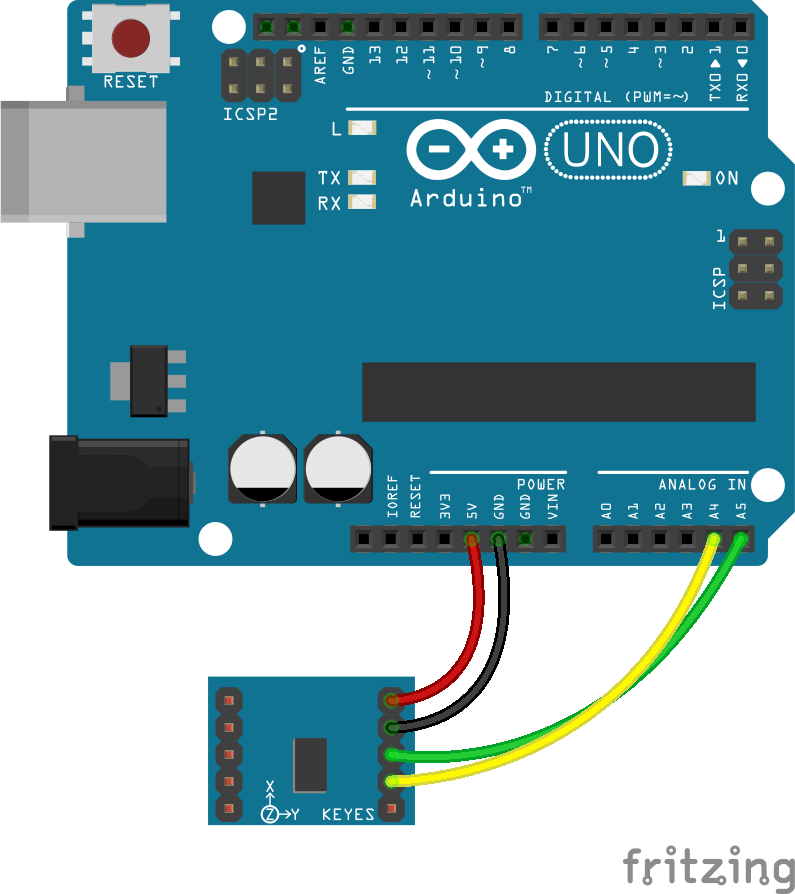
Wiring
Wire the two boards together as can be seen in the image below, taking care to match the pin numbers.
Coding
The code consists of includes, initialisations, a simple setup and loop. First the Wire.h standard library, the Adafruit Unified Sensor Driver library and Adafruit ADXL345 Accelerometer Driver library are linked to the code. These are then used to initialise a sensor object and event object that will interact with the module. Next the setup launches the serial monitor, which provides a simple method to debug our output. In the loop we first poll the sensor for fresh data. With the data in hand we can break it down and store it in seperate variables. Repeating for each of the 3 axis. The data is then output to the serial monitor. To demonstrate a simple use of the data, an if statement is constructed that monitors the value of the Z axis. When it is above '6' in this case, it will trigger and print a value to the monitor. This allows you to interpret the orientation that the module is in.
Load the code below into the Arduino IDE and upload it to your board.
/* A simple program designed to setup and demonstrate the ADXL345 sensor library and the ADXL345 3 axis accelerometer module - BDAA100046 The program uses the Adafruit ADXL345 library to monitor the output from the module, on detecting a change it relays it to the serial monitor. Furthermore the monitored output allows entry to an if statement when a value is detected on the Z axis. modified 4th April 2019 by Sebastian Karam - Flux Workshop The Adafruit Unified Sensor Driver library created by Adafruit Industries https://github.com/adafruit/Adafruit_Sensor Adafruit ADXL345 Accelerometer Driver created by Kevin Townsend for Adafruit Industries https://github.com/adafruit/Adafruit_ADXL345 */ #include// include the Wire library #include // include the Adafruit Unified Sensor Driver library #include // include the Adafruit ADXL345 Accelerometer Driver library Adafruit_ADXL345_Unified sensor = Adafruit_ADXL345_Unified(12345); // instantiate a ADXL345 object sensors_event_t event; // instantiate a sensor event object void setup(void){ Serial.begin(9600); // launch the serial monitor } void loop(void) { sensor.getEvent(&event); // poll the sensor library for sensor data float x_event = event.acceleration.x; // store the current acceleration data for the X axis float y_event = event.acceleration.y; // store the current acceleration data for the Y axis float z_event = event.acceleration.z; // store the current acceleration data for the Z axis Serial.println((String)"X: " + x_event + " Y: " + y_event + " Z: " + z_event); // print the data to the serial monitor if (z_event > 6){ // an 'if' that looks for a value greater then a set value Serial.println("FLUX"); // perform a function if a a greater value is found - in this case print a string to the serial monitor } delay(1000); // Pause for a second before repeating the sensor poll }
Running
With the board loaded with the program and all the connections made the serial monitor will begin to show the data output by the module. In the example, I move the module from vertical in the X axis, through to the Y axis and then finally flat for the Z axis. Waiting for 5 seconds before each move. Notice that when the module is flat, the Z axis value is triggering the 'If' statment and printing the extra text.
What to try next?
- Use the values to interpret the orientation of a robot
- Detect movement and react, as the variables will be steady when at rest
- Use filters to roughly interpret location relative to a start point
Share this post
- 0 comment
- Tags: 3 Axis, Accelerometer, ADXL345, Arduino, BDAA100046, Keyes, UNO