Let's Workshop: LC Tech 4 Digit 7 Segment Parallel Display
Posted by Sebastian Karam on
Here is a quick introduction to using the LC Technology 4 digit 7 segment parallel display module. Hopefully it will provide you with the confidence include a display in your Arduino project.
This example will demonstrate the use of an Arduino UNO in controlling the 32 LEDs available in the module. Once connected and the first program loaded, the display will cycle through all the LEDs. The second will use the SevSeg library created by Dean Reading to display a counter and some animated text.
Components
- 1pcs Arduino UNO or Compatible - LCAA100005
- 1pcs 4 Digit 7 Segment Parallel Display Module LC Blue - BCAA100021
- 13pcs Male to Female Jumper Cables - GBAA100002
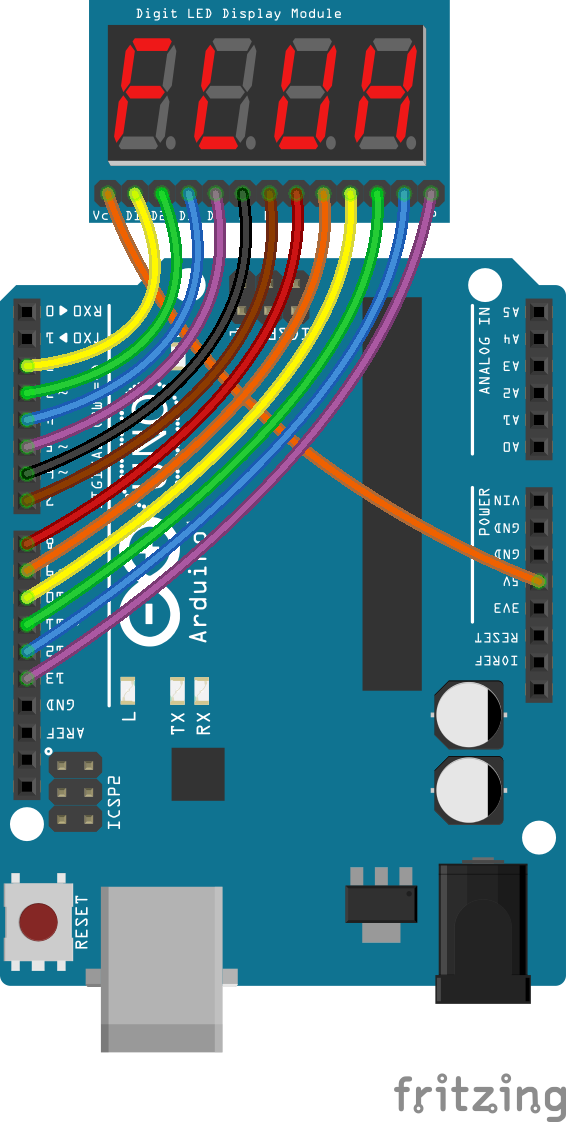
Wiring
Wire the two boards together as can be seen in the image below, taking care to match the pin numbers.
Coding
Example 1:
The code consists of the a setup and single loop. The setup defines the pins to be used in the control of the module. The loop contains the control program that will run continuously after the setup. It is made up of two nested loops. The outer one cycles through the digits while the inner one cycles each segment.
Load the code below into the Arduino IDE and upload it to your board.
/*
  A simple program designed to setup and demonstrate the 7 SEGMENT PARALLEL LED MODULE - BCAA100021

  The program selects a digit and segment in order and light it.
  Once looped, it will change to the next digit and repeat.

  modified 08 February 2019
  by Sebastian Karam - Flux Workshop
*/

// these constants won't change:
const int ledCount = 8;    // the number of LEDs in the display
const int digitCount = 4;    // the number of digits in the display
int ledPins[] = { 6, 7, 8, 9, 10, 11, 12, 13};   // an array of pin numbers to which LEDs are attached
int digitPins[] = { 2, 3, 4, 5};   // an array of pin numbers to which LEDs are attached

void setup() {
  // loop over the LED pin array and set them all to output:
  for (int thisLed = 0; thisLed < ledCount; thisLed++) {
    pinMode(ledPins[thisLed], OUTPUT);
    digitalWrite(ledPins[thisLed],HIGH);
  }
  // loop over the digit pin array and set them all to output:
  for (int thisDigit = 0; thisDigit < digitCount; thisDigit++) {
    pinMode(digitPins[thisDigit], OUTPUT);
    digitalWrite(digitPins[thisDigit],HIGH);
  }
}

void loop() { // the loop function runs over and over again forever
//  // digit loop
  for (int thisDigit = 0; thisDigit < digitCount; thisDigit++) {
    digitalWrite(digitPins[thisDigit],LOW); // sets the digit
    // LED loop
    for (int thisLed = 0; thisLed < ledCount; thisLed++) {
       digitalWrite(ledPins[thisLed],LOW); // illuminates the LED
       delay(100);
       digitalWrite(ledPins[thisLed],HIGH); // extinguishes the LED
    }
    digitalWrite(digitPins[thisDigit],HIGH);
  }
}
Running
With the board loaded with the program and all the connections made the display will begin to cycle through all the LEDs in the module. The output should be as seen below.

Example 2:
The code consists of the an include, a definition, setup and loop. First the SevSeg library is linked to the code. This is followed by an array definition that will be used in the loops. The setup defines the pins to be used in the control of the module. The loop contains the control program that will run continuously after the setup. It is made up of three loops. The first establishes cycles through a count to 1000 from 0, refreshing the display 2500 times before moving to the next. The second loop sends individual strings stored within the 'fluxstring' array to the display, refreshing the display 20000 times between each string. This provides sufficient time for the user to view the output. The entire array is then loop through 10 times. The final loop is the reverse of the first, counting from 1000 down to 0.
Load the code below into the Arduino IDE and upload it to your board.
/*
  A simple program designed to setup and demonstrate the SevSeg library and
  7 SEGMENT PARALLEL LED MODULE - BCAA100021

  The program uses the SevSeg library to count up to 1000,
  display an animation and count back down to 0. Then repeat

  modified 08 February 2019
  by Sebastian Karam - Flux Workshop

  The SevSeg library created by Dean Reading
  https://github.com/DeanIsMe/SevSeg
*/

#include "SevSeg.h" // include the SevSeg library
SevSeg sevseg; // instantiate a seven segment controller object

char* fluxstring[] = { // a small array for a string animation
  "----",
  "---F",
  "--FL",
  "-FLU",
  "FLUX",
  "LUX-",
  "UX--",
  "X---"
};

void setup() {
  byte numDigits = 4;
  byte digitPins[] = {2, 3, 4, 5}; // set the pins used by the digits
  byte segmentPins[] = {6, 7, 8, 9, 10, 11, 12, 13}; // set the pins used by the segments
  bool resistorsOnSegments = true; // 'false' means resistors are on digit pins
  byte hardwareConfig = P_TRANSISTORS; // See README.md for options
  bool updateWithDelays = false; // Default 'false' is Recommended
  bool leadingZeros = false; // Use 'true' if you'd like to keep the leading zeros
  bool disableDecPoint = false; // Use 'true' if your decimal point doesn't exist or isn't connected

  sevseg.begin(hardwareConfig, numDigits, digitPins, segmentPins, resistorsOnSegments,
  updateWithDelays, leadingZeros, disableDecPoint); // send the setup to the library
  sevseg.setBrightness(90);
}

void loop() {
  // count up to 1000
  for (int count = 0; count < 1000; count++){ // run the count
    sevseg.setNumber(count,0); // send the library the number
    for (int refresh = 0;refresh < 2500; refresh++){ // run the refresh multiple times to allow make it readable
      sevseg.refreshDisplay(); // Must run repeatedly
    }
  }
  // display some animated text
  for (int animate = 0; animate < 10; animate++){ // Loop the entire animation 10 times
    for (int count = 0; count < 8; count++){ // run through the array
    sevseg.setChars(fluxstring[count]); // send the library the string
      for (int refresh = 0;refresh < 20000; refresh++){ // run the refresh multiple times to allow make it readable
        sevseg.refreshDisplay(); // Must run repeatedly
      }
    }
  }
  // count down from 1000
  for (int count = 1000; count > 0; count--){ // run down the count
    sevseg.setNumber(count,0); // send the library the number
    for (int refresh = 0;refresh < 2500; refresh++){ // run the refresh multiple times to allow make it readable
      sevseg.refreshDisplay(); // Must run repeatedly
    }
  }
}
Running
With the board loaded with the program and all the connections made the display should begin to count to 1000 then cycle a text animation before counting back down to 0. The output should be as seen below.
What to try next?
- Output a timer to the display
- Use the LEDs to build a VU spectrum audio display
Share this post
- 5721 comments
- Tags: 4 Digit, 7 Segment, BCAA100021, LC Technology, Parallel
hydroxychloroquine update today https://chloroquinehydro.com/ hydroxychloroquine zinc generic chloroquine phosphate buy chloroquine singapore
accutane for acne isotretinoine roaccutane side effects https://isotroinisotretinoin.com/
chloroquine buy chloroquine phosphate tablet clonopine meaning chloroquine prophylaxis https://hydroxychloroquin1mg.com/
chloroquine hydrochloride what is hydroxychloroquine where can i buy hydroxychloroquine chloroquine hcl [url=https://hydroxychloroqui.com/ ]chloroquine us [/url]
hydroxychloroquine online [url=https://hydroxychloroquine20.com/ ]chloroquine side effects [/url] buy plaquenil chloroquine phosphate brand name what is hydroxychloroquine prescribed for